This is a card that I made recently for a friends birthday. The Joanna Sheen rose was stamped onto a piece of white stamping card that had been used to mop up the last bit of ink from my craft mat at the end of a previous ink smooshing session. I can't remember what inks I used and the result is very subtle. I used black Memento ink to stamp the image and then coloured it with Promarkers. Next I cut it with a die from the Spellbinders Radiant Rectangles set, and then mounted it onto a green mat. I chose two patterned papers from an old Papermania pad called Regency, and cut two rectangular panels each with a scalloped edge on one short side. These were also mounted onto matching green card. I wrapped a length of green silk ribbon around the striped one and tied a bow on the edge, before fixing them to the 15cm. square base card, and sticking the rose panel on top. I stuck a piece of the spotted paper to some thin card before die cutting the small butterfly with a Cheery Lynne die. I gave it several coats of clear Wink of Stellar before adding it to the card and sticking some tiny pearls to it's body. The Birthday greeting is my favourite little Stamp Tapestry stamp. As I used my Cuttlebug machine for the die cutting I am entering this at,
Cuttlebug Mania - May Flowers, and also at the following challenges. Simon Says Stamp - Flowers
Stamping Sensations - Anything Goes
my Crafty Corner
Cards and other handicrafts made by Jean Straw
Wednesday, 11 May 2016
Saturday, 30 April 2016
Robbins For Rudolph Day
Hello, here I am very late again with my Rudolph Day card this month. We have been away this week and I made my card ready before we went and started to prepare the blog post but I lost the photos as I uploaded them from the camera and I just didn't have time to sort it out before we left. However we are home again now and magically my photos turned up again when turned the computer on!! So I think I might just get this posted before the close of play.The main stamp I used for this is from Crafty Individuals, and I stamped it onto white card with black Memento ink. I coloured it with Coloursoft pencils and Distress Markers, and after trimming it close to the image I brushed the edges with Tea Dye Distress ink. Next I mounted it onto a red mirri card mat cut with a scalloped Spellbinder Nestabilities dye. The base card is a white A6 size with the fold on the short side. I stamped the Chocolate Baroque corner stamp and sentiment directly onto the card with Olympia Green Memento ink, and then stuck the image panel in place. I added some Stickles to the corner berries and to the icicles on the main image to give bit of sparkle.
I am now going to dash over to enter the Rudolph Day Challenge at Scraps of Life by Scrappymo.
Thank you so much for visiting here today and for all your kind comments on my last post. I am fine now and hope to get round to visiting all your blogs soon.
Jean
I am now going to dash over to enter the Rudolph Day Challenge at Scraps of Life by Scrappymo.
Thank you so much for visiting here today and for all your kind comments on my last post. I am fine now and hope to get round to visiting all your blogs soon.
Jean
Friday, 15 April 2016
Birthday Snippets
Once more it has been ages since my last post. A little accident and nasty bug have left me with little inspiration for craft or blogging recently, so I apologise yet again for my lack of commenting and I hope to be back to normal soon.
I suddenly realised that I needed a birthday card to post for this weekend so set about to make something fairly flat and pretty, and this is what I came up with. I cut and folded a white 15cm. square base card, and all the other card used was from the snippets boxes. For the background colour swipes I used a stamp from a Paper Smooches set, stamped with three various ink pads. I just picked colours that I liked the look of together. The leaves and flowers and the tiny butterflies are all Stampin Up stamps. The centers are stamped with yellow ink and then prettied up with yellow Stickles. The sentiment stamp is from a Sheena Douglas set that came free with a magazine that I was looking at because it had some pretty fairy stamps and a flowery embossing folder with it and then I realised there was this fabulous SD set as well as an extra freebie with copies sold in Sainsbury's. It has two nice sentiments a lovely corner flourish and several nature, meadow flower type stamps. The layering card is from Papermania, and this was the last little piece of this particular shade and it was just big enough to cut both mats. All the squares were cut with Li'inkers stitched square dies. The sentiment square looked too white so I stamped some random dots in the same inks as the flower background. I stamped an extra flower and cut it out and fixed it where the panels overlapped, and stamped a further partial flower onto the card base, and the little flight of butterflies to the right of the main image.
Now I am popping over to link this up at Pixies's Snippet Playground.
I am also entering at Stamping Sensations - One For The Girls
Thank you for visiting. and for your comments, I really appreciate them all.
Jean
Wednesday, 30 March 2016
A Little Late For Rudolph Day
Hello, I am here with a card for the Rudolph Day challenge at Scraps Of Life With Scrappy Mo. I am a bit more than a few days late this month as RD is the 25th, but as the challenge remains open till the end of the month I will just about get there in time.
As this is only the second Christmas card I have made so far this year I went for a fairly CAS style so that I could make several at the same time. While I was staying with my sister Kate recently she gave me a bundle of mirri card in lovely jewel colours and I decided to use some of this for my cards. First I cut and folded six A6 size ivory base cards with the fold on the short edge. Next I cut panels of the mirri card slightly smaller than the card fronts, and stuck them in place. I cut six smaller pieces of ivory card and stamped the trees with a Paper Artsy stamp and Versafine Olympia Green ink. I embossed the images with some very old green EP. The Noel stamp is from the same set as the trees and I stamped with various inks to match the mirri card and embossed them with WOW clear EP. The two gold ones were stamped with Versamark and embossed with gold
EP. I then stuck these panels in place and finished them with tiny gems in matching colours.
So now I am off to link this up at
The Rudolph Day Challenge - Make a Christmas Card.
Thank you for visiting today and for your comments, I really appreciate them all.
Jean
Friday, 18 March 2016
A Snippet Card and a Crochet Ta-Da!!
This card was made for my brother in law whose birthday is this weekend. Apart from the A6 size base card it was made entirely from snippets so when I have done here I shall be skipping over to Pixie's Snippet Playground to see what fun and games the other playmates are getting up to.
The stamp I used is Reflections from Inkylicious, stamped onto white card with Memento, Olive Grove ink, and then the background coloured with distress ink and ink duster brushes. I cut it with a Nellie Snellen oval die and as it was the largest in the set I drew round the outside edge of the die onto dark green card and cut it out by hand to make the mat.The trellis is cut with a Memory Box die from another snippet of the same green card. The back panel is a snippet of light blue card trimmed slightly smaller than the card front and embossed with a Stampin Up folder called Stylish Stripes. The top part of the sentiment came with the Inkylicious stamp and the Birthday bit is from Stamp tapestry.
The challenges I am entering are Pixies Snippet Playground - Use Snippets
and Dream Valley Challenges - All About Birthdays
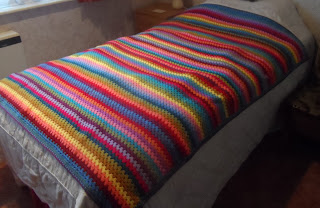
Now for my Crochet Ta Da!! moment. At
Christmas my family gave me two lovely Attic 24 blanket kits from the Wool Warehouse, and I am happy to say that I finished the first one last week end. There is a choice of two patterns with this kit and I chose to make the Sunny Granny Stripe one. There are fifteen colours all together and it is very bright. This is a poor photo because there is a rather bumpy bedcover under it. I just put it over the spare bed in order to get a complete photo. I have taken this close up of the corner to show the pattern and the neat little border. I have already started the second one, it is not as bright as
this with one more autumnal shades and a slightly different stitch
pattern. Watch this space!!
Thank you all for visiting here and for all your lovely comments, I appreciate all of them.
Jean
The stamp I used is Reflections from Inkylicious, stamped onto white card with Memento, Olive Grove ink, and then the background coloured with distress ink and ink duster brushes. I cut it with a Nellie Snellen oval die and as it was the largest in the set I drew round the outside edge of the die onto dark green card and cut it out by hand to make the mat.The trellis is cut with a Memory Box die from another snippet of the same green card. The back panel is a snippet of light blue card trimmed slightly smaller than the card front and embossed with a Stampin Up folder called Stylish Stripes. The top part of the sentiment came with the Inkylicious stamp and the Birthday bit is from Stamp tapestry.
The challenges I am entering are Pixies Snippet Playground - Use Snippets
and Dream Valley Challenges - All About Birthdays
Christmas my family gave me two lovely Attic 24 blanket kits from the Wool Warehouse, and I am happy to say that I finished the first one last week end. There is a choice of two patterns with this kit and I chose to make the Sunny Granny Stripe one. There are fifteen colours all together and it is very bright. This is a poor photo because there is a rather bumpy bedcover under it. I just put it over the spare bed in order to get a complete photo. I have taken this close up of the corner to show the pattern and the neat little border. I have already started the second one, it is not as bright as
pattern. Watch this space!!
Thank you all for visiting here and for all your lovely comments, I appreciate all of them.
Jean
Thursday, 3 March 2016
Spring Birthday
Hello everyone, here is a Birthday card made recently for one of my sisters. Fortunately she lives near me and I knew I would see her on the right day so I didn't have to be too concerned about the layers on it.
I started by stamping the silhouette stamp from Stampin' Up with brown Archival ink, (Potting Soil), onto a snippet of white card. I then die cut it using the 2nd largest die from the Spellbinder set, Elegant Ovals, and while it was still in the die I lightly brushed around the edge with Broken China Distress ink. I coloured the leaves green with a marker pen and added some tiny spots of Flower Soft to look like blossom. I die cut a stitched rectangle of patterned paper from LOTV Country Lady pad using a Lil'inker die and matted it onto some pale pink card, and then stuck the oval onto it.The base card is a 15cm white square with the front partially covered with another paper from the same LOTV pad and also matted onto the same pink card. All of the cut pieces of paper and card were edged with a brown distress marker. I like to do this with almost all of my cards as I think it adds definition to the edges. I wrapped some pale pink satin edged organza ribbon around the card before fixing the image panel with thin foam tape. I made the little roses using a Brittania die and snippets of the pink and a tiny snippet of green card. The petals are edged with a pink distress marker and given a little sparkle with Diamond Stickles. To finish off I made a bow with the ribbon and fixed it together with a small die cut tag stamped with Happy Birthday. The stamp is from Stamp Tapestry but I'm not sure what make the mini tag die is.
As I used a few snippets I am taking this over to Pixies Snippets Playground - Use Snippets.
I am also entering at The Sisterhood of Crafters - Think Spring
The Artistic Stamper - Springtime
Live and Love Crafts - Signs of Spring
Thank you for visiting here today and for your kind comments, they are all really appreciated.
Jean
Thursday, 25 February 2016
February Rudolph Day
This is a one layer card for easy posting, and the stamps used are Chocolate Baroque, apart from the greeting which is a magazine freebie. All the stamping is done with Memento Expresso Truffle ink, and coloured with coloursoft pencils, blended with Sansodor and a paper stump.I added a few touches of gold with a gel pen. When I had finished colouring I cut an oval aperture from some spare card and used it as a stencil to add a glow around the lantern, using Squeezed Lemonade and Antique Linen Distress inks and a duster brush. I brushed over the lighted area with clear Wink of Stellar and used a snippet of gold peel off for the hanging chain. I also added a touch of snow effect along the branch and cones with some sparkly white embossing powder.
So now I am off to link this up at The Rudolph Day Challenge. This is a lovely friendly Challenge to take part in so if you feel like making a start on Christmas cards it runs from today 25th until the end of the month.
Thank you for visiting here today and for your comments, I appreciate them all.
Jean
Subscribe to:
Posts (Atom)