my Crafty Corner

Cards and other handicrafts made by Jean Straw

Monday, 25 September 2017

Rudolph Day Sparkle

Hi! It's time for the Rudolph Day  challenge again, and for once I am ready to play on the right day and in the morning too.This a lovely friendly challenge which runs every month from 25th till the end of the month and is aimed at getting a head start on christmas card making throughout the year. There are only two more RDs this year and I am still behind the target I was hoping for, but I have a nice stash of just over half of what I need so I 'm on the way.
Todays' card is a nice sparkly holly wreath made with a Poppy Stamps  stencil and their clear stencil paste and glitters. I bought the stencil about two years ago at the Birmingham craft show because I liked the lovely card on display. when I asked about how it was done I was told that the stencil paste contains an adhesive which allows the glitter to stick. however when I got home and tried it I realized that it would be difficult to get the different coloured glitters in the right place and after a few disastrous attempts I gave up. While I was at another show earlier this year I visited their stand again and asked the demonstrator how to do it and she told me that she cut an ordinary plastic drinking straw at an oblique angle which makes a pointed sort of nib which makes it easy to pick up a small amount of glitter and drop in the right place. I also watched a u-tube video on their website. I'm afraid I don't know either of these ladies names but between them they helped me to get a reasonable result. I am including a close up here so
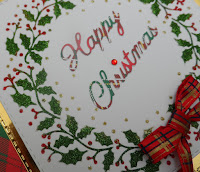
hopefully you can really see the sparkle. The backing
paper that I've used is a printable download from
LOTV. I printed it onto A4 paper so after cutting it to fit the card I had offcuts which I used to die cut the greeting with a Britannia die. I used gold mirri card for the mat and both the image and the mat were cut with Li'l inkers dies. I added a tiny gem to dot the I and a ribbon bow to finish it. It took a bit of patience and equipment to make so I made three all the same while everything was out.
I'm sorry if this is a bit of a ramble but thank you if you stuck with it. I am now going to link this with the Rudolph day Challenge at Scraps of Life by Scrappymo, where the theme is always Anything Christmas.

Thank you for your visit and for your comments, I appreciate them all.

Jean

Wednesday, 6 September 2017

A Big day For A Little Girl

Hello everyone, today I
have got a card to show you 
that I made this afternoon for the eldest of my five little 
Great Granddaughters. She is going to start school  next week and she is really
looking forward to it. How
time flies!!!. She is quite a
bright little girl and we have
enjoyed some happy crafty
sessions together during the 
summer. 
I was ordering stamps from
LOTV recently and I thought
this stamp was perfect for the
occasion. I stamped it onto a snippet of white card with 
Archival Watering Can ink and coloured it with Zig water colour pens. I cut it out using a Spellbinders circle die, and inked the edge lightly with Stormy Sky Distress ink. The sentiment is computer generated and cut with a smaller die from the same set and inked in the same way. The patterned paper is cut from a 6" pad that I have had for ages, I think it is Penny Black. I found a piece of dark blue card in the snippets box which wasn't big enough to cut the backing mat and the scalloped mats, so I cut the square first to fit the front of my 6" square card base, leaving a narrow border, and then cut the larger scalloped mat from the center of it. I cut the smaller scalloped mat from the center of the large one both using Spellbinders scalloped circle dies. I stuck the patterned paper to the blue card and then to the card front. The alphabet ribbon has been in my stash for years and I was pleased to find a use for it at last. The ribbon is quite thick so I tucked it right inside the card by making a slit in the spine and threading it through and secured it inside with sticky tape. I always add a separate insert which hides the ends. To finish I stuck the image and sentiment discs to their respective scalloped mats and fixed the smaller one to the card with double sided tape and the image one with foam tape.

I am going to enter this at Pixies Snippet Playground - Use Snippets
                                                      ( I used my Cuttlebug to do the die cutting)

Thank you for looking here today and for your comments, I really appreciate them.

Jean